Paired discussion can be a great way to increase the participation ratio within your class, providing students with focused opportunities to practice, explore and develop ideas within your subject.
Below is a link where you can download a 2 page summary of how Turn and Talk can be used effectively. The summary covers:
Although there are many things involved in teaching English effectively, the process of helping students to access, think about and respond to challenging texts is one of the most important.
Annotations can unlock complex texts, providing students with examples, explanations and links to other, relevant and connected ideas.
Here are some ideas that may help with this aspect of the job.
Have two copies of the text
Whether you are teaching a poem, an extract or an article on some interesting and useful background knowledge that will help broaden students’ understanding of an idea, having two copies can be really useful. Pre-planning your questions and annotations on the one copy means that you can then use it as an aide-memoire in the lesson. I will often have my pre-annotated text next to the one that I am annotating under the visualiser to remind me what to focus on when teaching.
Fully complete all tasks so you understand what is required
If you are teaching an article that explores the idea of a tragic hero, perhaps to help students better understand this literary convention and therefore apply it when writing about Macbeth, you may ask students to answer text dependent questions about the text so that they can demonstrate their understanding of what they are reading. Completing the questions yourself before the lesson will help you to focus your explanations and annotations in the lesson. If they really need to understand the complex sentence on line 15, this will be a useful focus for annotations.
Annotate bit by bit
I teach using a visualiser and display my text on the projector to the class. In order to avoid the split-attention effect, I add a couple of annotations (sometimes my ideas, sometimes the ideas of students) while students pay attention and watch. I then ask students to add the annotations to their text before asking them to put their pens down and direct their attention back to the board again.
Teach Everything Needed for Success in Writing
After discussing and annotating a text, students will often write about it in order to develop their ideas and interpretations. Depending on the class or the text, the annotation process may be more teacher or student led but the goal should be to ensure that all students are able to write about the text. If they struggle with the writing, it may be that you haven’t helped them to understand enough of what they have read.
Think out Loud
Modelling annotation for a class is a means of developing their conception of what a reader (and writer) could focus on when grappling with a text. Narrating your thought process with regards to why something is interesting or striking can be really helpful. ‘This phraseseems odd: it doesn’t really fit the general mood’. ‘This line is interesting, giving a sense of…..’ ‘There seems to be a pattern here’
Board=Paper (TLAC)
If I am leading students through a tricky text, I may tell the class that ‘you need to add all of the annotations I am making but you can of course add additional ideas‘. This approach has a number of benefits. It can help to ensure that students are paying attention. It can also ensure that all students have useful explanatory information about the text, helping them to understand it. Over time, this provides students with many, many examples of how they can respond to texts, the annotations often focussing on the kind of things readers and writers can notice: imagery, links, ideas, patterns etc.
Annotate High Utility Stuff
This post, from David Didau, explores the idea of ‘creative reading’, listing some high-utility things that students ought to be looking for. I can highly recommend a book referenced in that post called ‘This Thing Called Literature’ by Bennett and Royle.
Some things that we teach are more useful than others and this is also an important idea to consider when annotating. While explaining a tricky phrase in a difficult text may be crucial for understanding that specific text, understanding this recondite component may have minimal use outside of this text. Helping students to develop the habits of mind associated with interpretation, and therefore focussing annotation on more transferable things like perspective, tone or motifs may be more useful.
Annotation and the process of learning
According to Richard E Mayer, if students are to understand what they are learning, they need to successfully engage with three stages:
Students have to select the relevant information
Students have to organise the material into a coherent cognitive structure in working memory
Students have to integrate it with relevant prior knowledge activated from long term memory
This blog post explores this framework in more detail.
When whole class annotation is done well, it can ensure that students engage in all three stages, thereby making it more likely that they will understand what they are learning.
To help students select the relevant information, it may be helpful to focus annotation and teaching on what is required for success in a subsequent writing task
To help students organise the material into a coherent cognitive structure in working memory, it can be helpful to annotate bit by bit, stopping to ask students to discuss what is being annotated.
To help students to integrate it with relevant prior knowledge activated from long term memory, annotations will often explain abstruse concepts using familiar synonyms or by providing examples or non-examples that link what has been annotated to what students already know.
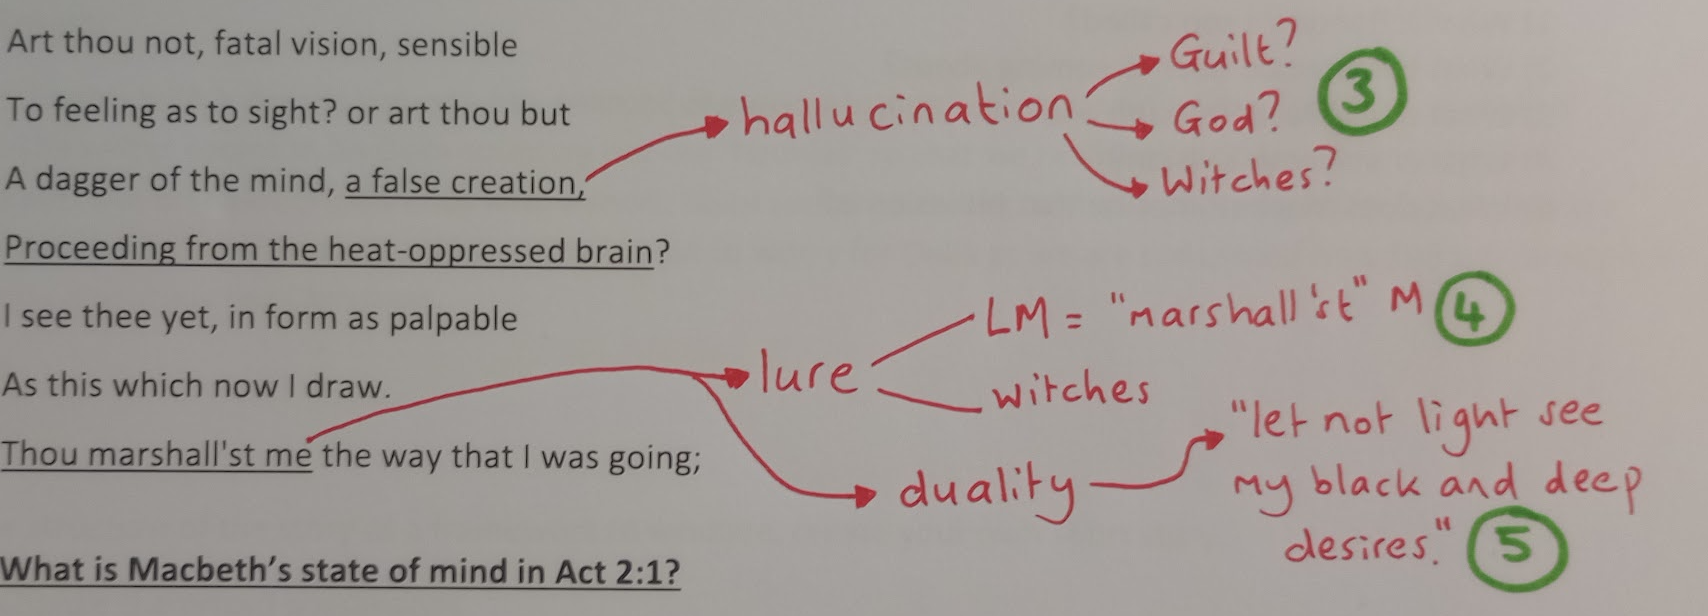
Let’s have a look at some examples:
The picture above shows an annotated non-fiction text that gives some useful context to Macbeth. Annotation no:1 explains a piece of vocabulary. While you could just annotate and move on, if you think that word is worthy of practising, you could do this:
1.Annotate it
2. Ask students to use it, perhaps through Think Pair Share or using Mini White Boards: Why were women expected to complete domestic duties? (Use domestic in your answer)
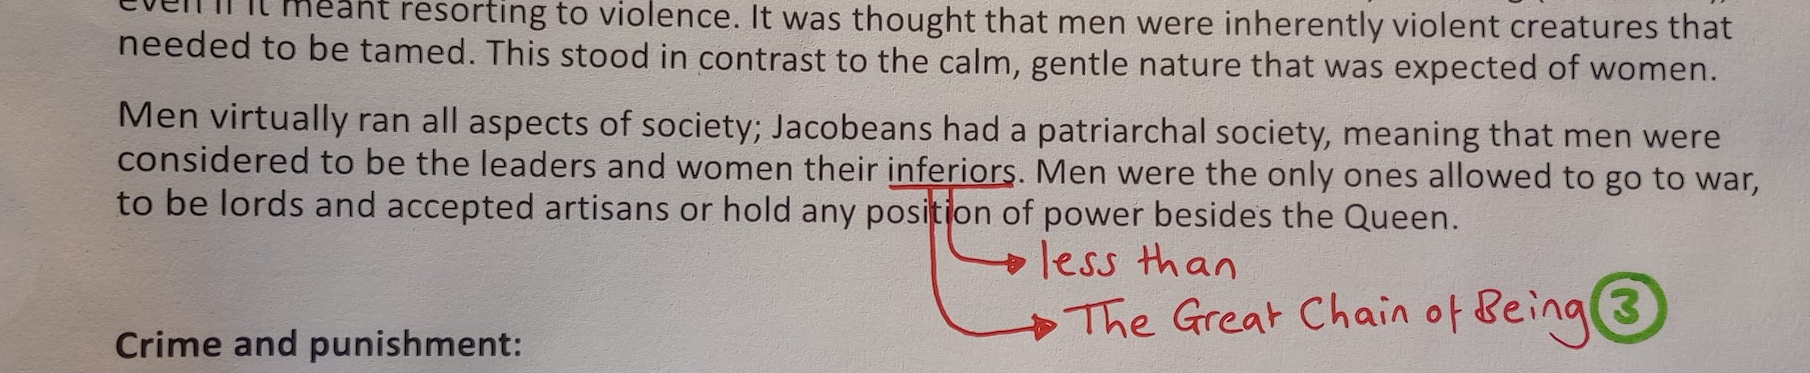
Annotation no:2 teaches a new piece of vocabulary (patriarchal) in conjunction with what they are reading. You could do something like this:
Annotate it
Use Choral Response so the whole class practice saying it. You could also explain and practice different forms of the word (patriarchy/patriarch)
Ask students to use this new word, again by using Think Pair Share or Mini White Boards: How do you know that Jacobean society was patriarchal (Use patriarchal in your answer)
In the picture above, the annotation explains the word and also makes a link to connected ideas, in this case ‘The Great Chain of Being’. When student learn something for the first time, their knowledge is typically inflexible and linked to the cues that existed when they first encountered it. In order to broaden their understanding, we need to explicitly show them how concepts can be applied in different places and how they link to other ideas. This type of annotation, deliberately recycling important prior knowledge, can help with this.
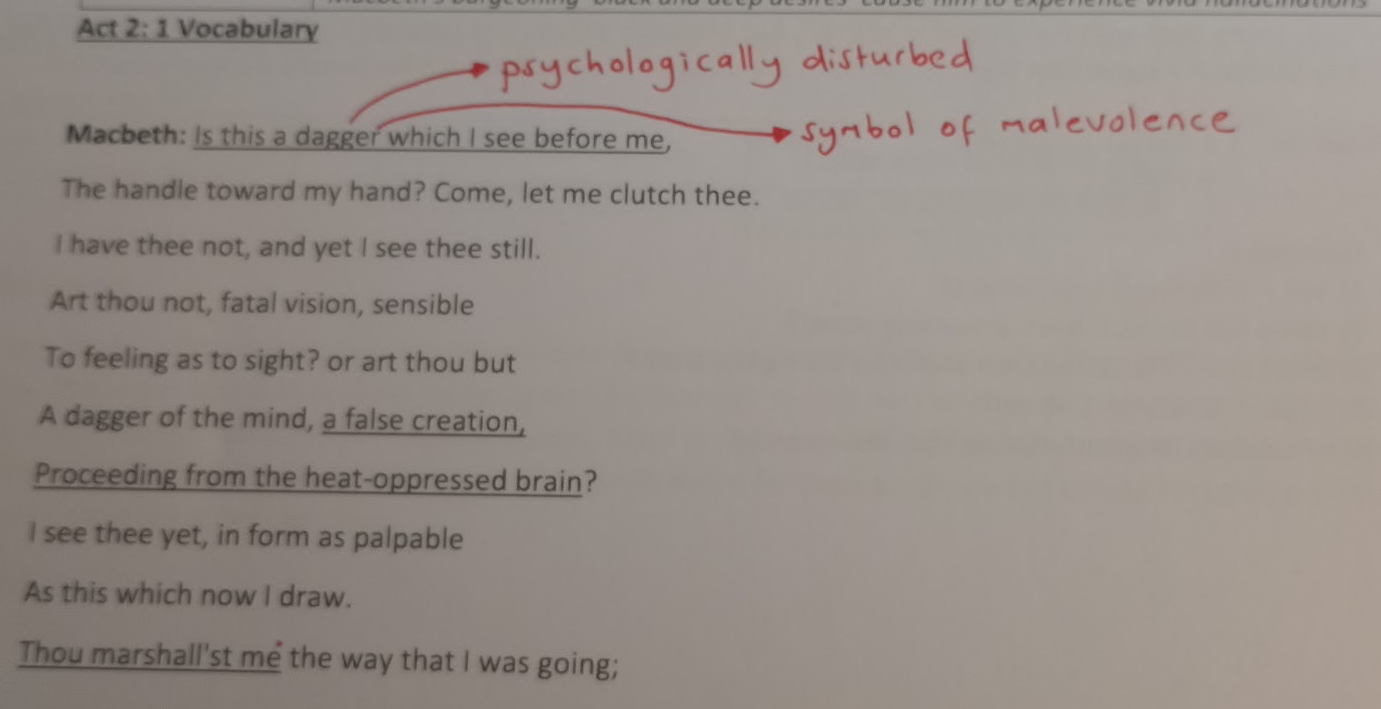
After making the two annotations above, the teacher can ask a whole range of questions to get students to think about what is being suggested. Here are some examples:
How can you argue that he is psychologically disturbed?
Hoe can you argue that he is not? What else could explain his hallucination?
Who else in the play could be psychologically disturbed and why?
Why is ‘the dagger’ such an effective symbol of malevolence?
How is a dagger different to sword and how does this add to your interpretation here?
What else in the play can be seen as a symbol of malevolence?
Annotation no.3 gives students three options to decide from: who or what is it that has caused his hallucination? Providing options like this can help fuel a discussion.
Annotation no.4 asks students to think about who or what lures or controls macbeth, helping them to make links across the text and notice similarities.
Annotation no.5 asks students to make links between different pieces of evidence in order to build up a more comprehensive interpretation of Macbeth’s behaviour. You could ask questions like ‘How does the dagger symbolise his ‘black and deep desires’
In my last post, I outlined a number of efficient approaches for practising vocabulary. Below is a link where you can download a 2 page summary of these ideas.
The summary has some additional ideas about how to consolidate new vocabulary so that students are able to retain and apply the words to the maximum range of relevant contexts.
These ideas, as well as many others, are explained in depth in my new book
If you are interested in how to approach vocabulary in more detail, you may enjoy reading my new book
Alex Quigley, the writer of Closing the Vocabulary Gap, explains a helpful approach to teaching vocabulary, summarised via a memorable acronym: SEEC (Select, Explain, Explore, Consolidate)
Select
Whatever subject you teach, there will always be far too many words and too little time to teach them all. So how can you decide which words to focus on? Which words are ‘the best’? Which words are ‘the most useful?’ These are interesting questions, which, despite not having easy or definitive answers, are queries that subject leaders and teams should be grappling with.
Some words, and these are often Tier 3 (what used to be called ‘key words’), are essential and will be taught irrespective of any disagreement with regards to the questions in the preceding paragraph. So how can we decide on what other words to teach? Here are three questions that might help:
Do students need to know this word to comprehend this text/lesson or to complete a specific task?
If yes, it is essential to teach this word
Do students need to know this word to comprehend other texts, lessons or topics?
Would the word help them in a general sense in terms of increasing the precision or sophistication of their communication?
If yes, to either or both of these questions, it is worth teaching this word
The best words to teach have the highest utility, or to use an analogous phrase, they are transferable and give students important and flexible knowledge.
2) Explain
When we learn something new, we process what we pay attention to through different levels. This is known as the Levels of Processing Model, a framework that posits that there are three level of processing:
Phonemic (paying attention to the sound of a word)
Structural (paying attention to what it looks like: spelling etc)
Semantic (paying attention to what it means)
All three are vitally important if students are to learn a word properly and if students fail to process a word on one or more of these levels, it will result in problems.
Here are some strategies that can help with ensuring that students interact with a new word on all three levels:
Choral Response
This is great for practising pronunciation and if done well, can help ensure that students process new words phonemically. I typically say the word, give a signal, then ask the whole class to repeat it. If the word is polysyllabic and lengthy, it can be useful to segment it into morpographs or syllables to help scaffold pronunciation. For example, teaching the word ‘hierarchical’, may see me saying ‘Hire-arc-ick-al’ to help them see how to blend these units of sound when I ask them to say it fast
Choral response here is not enough though: I can watch S4C and attempt to parrot the Welsh that I hear and even if i get quite good at mimicking the words that I hear, this doesn’t mean that I understand them!
In addition, students may misremember or mishear the words and produce mondegreens or eggcorns, alternative yet plausible expressions that have meaning and yet are incorrect. One example of this phenomenon is when people say ‘I’m on tender hooks’ instead of ‘tenterhooks’. Similarly, if you think that Bob Dylan was a secret myrmecologist because he sang ‘The ants are my friends, they’re blowing in the wind’, you have experienced the dangers of erroneous phonemic processing.
Examples, Example, Examples
One of the best ways to explain new vocabulary is to provide students with lots of relevant examples of how the word can be used within a sentence. Ideally, these examples should be initially connected to the context in which they are learning the word, before adding in further examples that demonstrate how the word can be used in different contexts. Additionally, non-examples are really useful to show the limits and boundaries of how the word can be used. The wider the range of useful examples that are presented, the broader their understanding of the word will be: examples can facilitate semantic processing as they demonstrate the meaning of the word in context.
3) Explore
We want students to be able to effortlessly apply what we teach to the widest range of relevant contexts and for this to happen, we need to set up opportunities for them to use and manipulate their new words.
Here are 4 efficient strategies for exploring (practising and manipulating) new words. All four strategies are high ratio in that they expect all students to respond in a way that focuses on meaning (semantic processing from The Levels of Processing Model)
Spoken ‘because, but, so’
The Writing Revolution popularised ‘because, but, so’ as a means of providing students with sentence based vocabulary practice. This approach works equally well with Think Pair Share or Turn and Talk.
Here’s one way of doing it:
Teacher presents new vocabulary, perhaps using a vocabulary table
Teacher gives example sentences to elaborate on meaning and demonstrate application
Teacher asks students to complete sentences in pairs (30 secs)
Teacher cold calls students for feedback
Spoken Turn and Talk with vocabulary success criteria
Here’s how this can work:
Teacher presents new vocabulary, perhaps using a vocabulary table
Teacher gives example sentences to elaborate on meaning and demonstrate application
Teacher asks a question: Why was the Treaty of Versailles seen as oppressive? Make sure you use forms of the word oppressive in your answer)
Written: Include target vocabulary as success criteria
Here’s how this can work:
Teacher asks questions and asks students to include words in answer
E.g. What was the problem with the Treaty of Versaille
Use ‘oppressive’ and ‘punitive’ and ‘reparations’
Or…use 5 words from the vocab table in your answer
4) Consolidate
This final stage is crucial: after all, we want students to retain what we are teaching them so that they can use what they have learned at a later date. If we want students to remember what we teach them, we should be regularly and cumulatively testing them on what they have learned. See these blogs for more information.
When thinking about consolidation, there a a few important ideas that are worth considering:
We should gradually remove supports, prompts and scaffolds so that students are expected to do more independently over time. If we don’t remove these clues and prompts, their ability to retrieve the information will be limited to the cues that they have experienced: no cues=no recall.
We should move from restrictive to freer responses, starting with closed questions and moving towards more expansive open ended tasks
We should increase the width or breadth of a possible answer, starting with a focus on one thing (What word beginning with O means harsh treatment?) and moving towards chunking words in relation to a specific prompt (what 3 words did we learn to describe German reactions to the Treaty of Versaille?)
We should distribute retrieval practice over time until students are fluent. Overlearning past the point of consistent accuracy is a worthwhile pursuit if you have time!
In my last post, I explained how teaching high utility things through a strand curriculum can be really effective and how it may be an improvement over the far more commonplace spiral approach to sequencing.
This blog will explore an example instructional sequence I have used for teaching absolute phrases. This post explains these constructions in more detail. My new book explains how to create these sequences in far more depth
Lesson 1 Task 1
I showed these sentences under the visualiser. I chose to begin instruction with a common form of absolute phrases where the phrase seems to zoom in on an aspect of the subject.
Lesson 1 Task 2
I then wrote an incomplete sentence under the visualiser:
…and gave loads of spoken examples of absolute phrases, acting out what I was saying:
Mr. Needham stood at the front, arms waving frantically like a man who has lost the plot.
Mr. Needham stood at the front, his face screwed up in rage.
Mr. Needham stood at the front, eyebrows raised in surprise.
Mr. Needham stood at the front, his back turned to the class so that he could read the tiny print on the poster next to the whiteboard.
Mr. Needham stood at the front, fingers tapping rhythmically on Emmanuel’s desk.
Students then had to add an absolute phrase of their own in order to finish the incomplete sentence. I checked all students’ work (in hindsight, this would have been much easier to do if I had used mini-white boards!) and corrected any errors.
Lesson 1 Task 3
I then wrote a second incomplete sentence:
Students had to complete it by adding an absolute phrase. Again, I checked all student work to correct errors. They then did the same with this incomplete sentence:
Lesson 1 Task 4
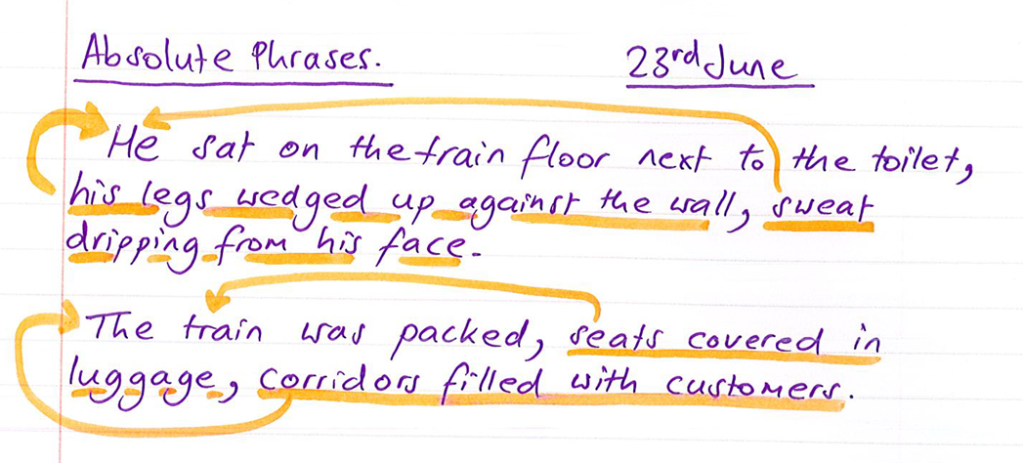
Directing their attention back to the original model sentences, I demonstrated how absolute phrases can be moved to different places in a sentence: the ability to manipulate and move elements within a sentence is a key part of developing a generalised understanding of specific constructions.
His legs wedged up against the wall, sweat dripping from his face, he sat on the train floor next to the toilet. Etc.
Students then had to rewrite their three sentences by moving the absolute phrase to the start of the sentence.
This process probably took 15mins or so and we then spent the rest of the lesson reading and discussing The Crucible.
Lesson 2 Task 1
I showed an example:
I then demonstrated how to move the phrase:
The teacher, eyebrows slanted over his blood-shot eyes, scowled.
Eyebrows slanted over his blood-shot eyes, the teacher scowled.
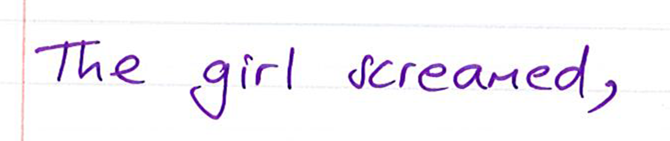
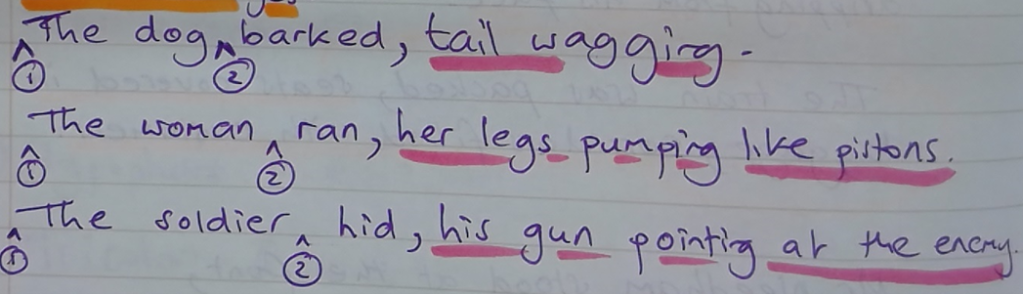
Lesson 2 Task 2
Next, I wrote three incomplete sentences and asked student to finish them by adding an absolute phrase:
The dog barked,……..
The woman ran,……
The soldier hid,…….
I gave loads of spoken examples:
The dog barked, teeth glinting in the moonlight.
The dog barked, his heckles raised.
The dog barked, nostrils flared in anger.
The woman ran, arms slashing the air like knives.
The woman ran, her bag held tight in her hands.
The soldier hid, his head peeping over the blockade as he searched for the enemy.
The soldier hid, heart racing in his chest.
All students then finished the 3 incomplete sentences in their books while I went round to give instant feedback: sentence 1 and 3 have the same error/sentence 4 is missing something. Hints and corrections were hopefully the least amount of support needed to ensure success, putting the onus on the kids to think.
Lesson 2 Task 3
I showed my three completed sentences and demonstrated how the phrase in the first sentence can be moved:
Sentence 1 position 1: Tail wagging, the dog barked.
Sentence 1 position 2: The dog, tail wagging, barked.
Admittedly, the second example is an ugly sentence but it serves to reinforce the idea that absolute phrases can be slotted into sentences in different locations whilst still performing the same function.
After hearing my examples, students had to manipulate the second two sentences by moving the phrases to the numbered locations.
Lesson 2 Task 4
Students had to create 2 sentences for these two topics:
A happy person
A scared person
This process also took around 15mins and we spent the rest of the lesson reading and discussing a short story.
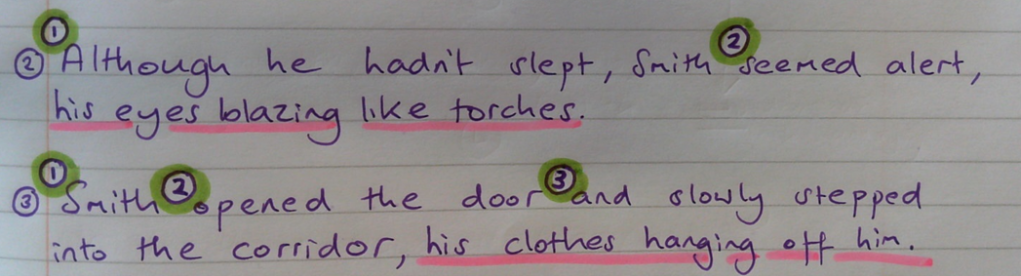
Lesson 3 Task 1
The model sentences in this lesson were based upon the short story that we had read and discussed in the previous lesson. I showed this sentence and gave some spoken examples of how the phrase can be moved:
1. Smith smiled a sinister smile, his yellow teeth sticking out of his mouth,as he gripped the side of his chair.
2. Smith smiled a sinister smile as he gripped the side of his chair, his yellow teeth sticking out of his mouth.
Lesson 3 Task 2
In pairs, students had to say/listen to the sentence with the phrase moved to the different numbered locations. When they were finished, I asked for some feedback
Lesson 3 Task 3
Students had to write 4 sentences, each with a different absolute phrase in a different numbered position. I went and checked the work of all students.
This process took around 10 minutes and we spent the rest of the lesson continuing to read and discuss a short story.
Lesson 4 Task 1
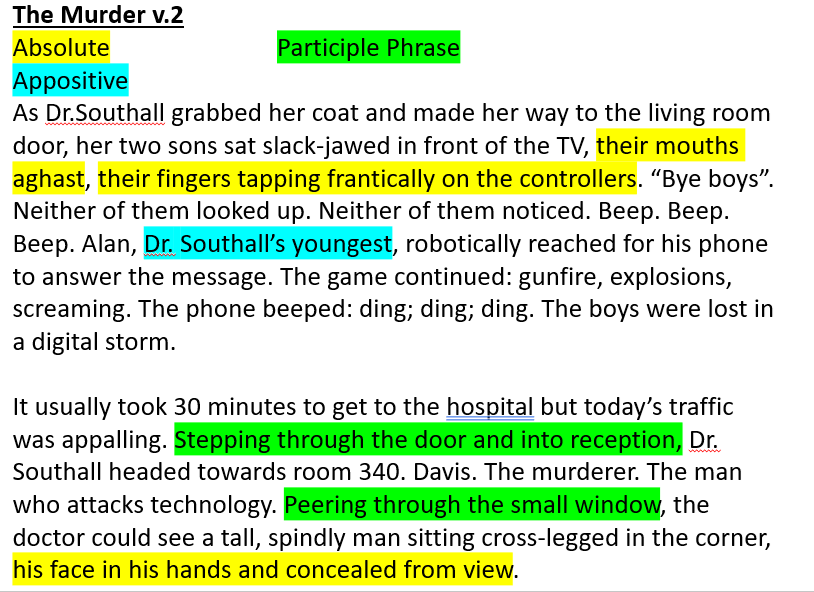
Because student success rates were consistently high throughout the first three lessons, I asked students to apply this new construction to a piece of creative writing inspired by Ray Bradbury’s The Murderer which we had read and discussed over the previous two lessons. This can be seen as prompted independent practice as students were reminded to include this style of sentence somewhere in their writing. Here is my model that I wrote while they wrote theirs:
What is next?
I will continue to ask them to practise this sentence over many more lessons. Sometimes this may take the form of a starter activity where they have to describe a picture; other times they will be asked to include the sentence in similar creative writing tasks to the one described above.
This post will explore how to create multi-lesson instructional sequences that can help students to become fluent and develop a generalised, flexible understanding of whatever it is you choose to teach. This approach, along with fully explained example sequences, is explored in depth in my new book.
Explicit instruction typically follows a gradual release model, moving from ‘I’ to ‘We’ to ‘You’. This sequence-beginning with models and moving through guided to freer practice-is supported by findings from cognitive science:
Novices learn most efficiently by studying models at the start of a sequence
Our working memories are limited so we should present new material in small steps
If we want students to remember what we teach them, we need to distribute practice over time
Transfer and flexible knowledge-or the ability to apply stuff to the widest possible range of contexts-can be achieved by varying the conditions of practice as well as ensuring that students engage in overlearning
In the next post we will look at an example of an instructional sequence but before we do so, we need to outline the approach to sequencing that underpins them.
Spiral vs Strand Planning
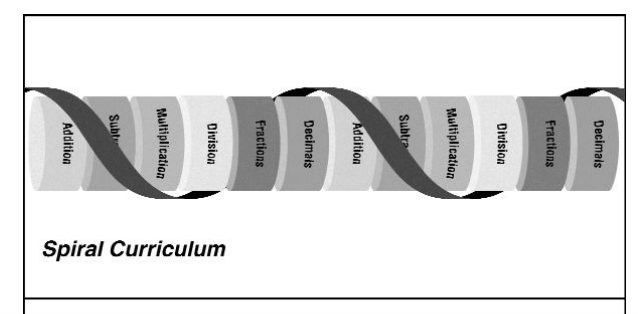
Many teachers will be familiar with the idea of a ‘spiral curriculum’ where students receive a rotating cycle of content.
Spiral planning in English can take a number of forms. It can be based on modality: half a term on writing; half a term on reading etc. Equally, it could be based upon text type where students spend a unit on poetry before moving onto a second unit on non-fiction. It could even involve a focus on smaller things like sentences where you spend some time in year 7 mastering semi-colons and colons before waiting until the same time next year to go over fancy punctuation again.
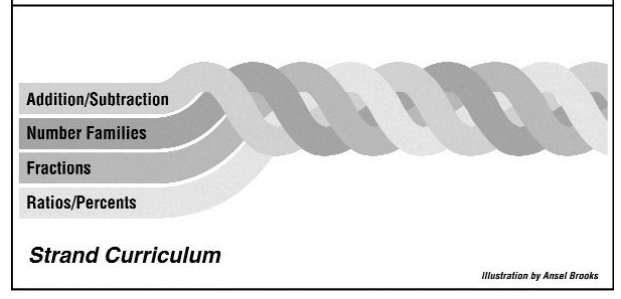
In a ‘Strand Curriculum’, lessons are never focussed on one thing, instead teaching lots of things at the same time. The picture above shows what this may look like in maths and it can work equally well in English. In a strand curriculum, skills will be taught across many, many lessons, and tasks will move through the 6 shifts of task design, changes that are really useful for helping design optimal practice activities. A single lesson will involve instruction on a number of threads, gradually moving students towards a generalised understanding of what is being taught as well as ensuring that success rates are continually high throughout the sequence.
But what will the threads look like in English? Firstly, you need to decide what are the highest utility things to teach. i.e. what can you teach that is most useful for students to be successful. When DI programmes are developed, the designers begin by analysing the content area that is being taught in order to ascertain which concepts or ideas are most useful to students and we should be approaching curriculum planning in the same way: the wider the potential application, the more useful it is to teach. This blog explores some possible high utility areas of content that we can teach.
Here are some things that I teach through instructional sequences:
The four things listed above are applicable to a wide range of possible tasks and texts and this is why it is worth spending sufficient time on them so that students become fluent and master them. To draw an analogy, if we were to focus on the highest utility things in football coaching, we might focus on passing, tackling and positioning, three skills that would be applicable to all forms of football including futsal, smaller game formats and traditional 11-a-side. If we were to focus on slide tackling or heading, these skills may not be applicable to all forms of the game.
What does a lesson within a strand curriculum look like? Instead of spending an entire lesson on one thing, lessons that contain strands will teach a number of different things at the same time. Often, these things will be components that will eventually be integrated and combined by students in wider extended writing. A lesson may spend 10 mins practising a specific sentence style and 15 mins practising an analytical skill before spending the rest of the lesson reading and discussing a text. So what is wrong with spiral planning? Why should we consider adopting a strand curriculum that relies on multi-lesson instructional sequences? Here are some potential problems with spiral curricula along with some explanation as to why strand planning may be more effective.
Topics arranged in a spiral are likely to be treated superficially by teachers and students alike.
Student A, who has already master weed colons and semi-colons in year 7, the repetition in year 8 is a waste of their time. If the topic is going to be repeated, there is little incentive for students, or teachers for that matter, to ensure that mastery is attained: don’t worry kids, if you can’t get it now, you will next time! This may signal to students that there is no requirement to pay attention or succeed as the Ferris wheel of content will eventually come full circle.
In a strand curriculum, however, students learn that success today feeds success tomorrow. Also, by narrowing the focus to the highest utility ideas, the amount of practice can be massively increased, leading to a much higher chance of students mastering what it is they are being taught.
Concepts in spiral curricula are often introduced too quickly
Spiral curricula often have units that are all the same length, their duration dictated by the length of a term or a set number of lessons. These arbitrary time scales often have nothing to do with how long is actually needed to teach something properly and as a result, concepts are often introduced too quickly, resulting in confusion as students are not given enough time to grapple with and practice what they are learning.
In a strand curriculum, the gradual introduction of complexity allows scaffolding to support the weakest students. Additionally, by atomising composite skills like extended writing into smaller components, these components can be practiced to the point of mastery before students are asked to combine them and use them in wider writing.
Spiral curricula can minimise academic learning time
If the rate that new concepts are introduced is not appropriate, this will cause problems. If the rate is too fast, students will not be successful because it will be too difficult; if the rate is too slow or involves redundant content that has already been mastered by some students the last time you did this topic, students will become bored.
Spending a whole lesson on one thing may not be the best approach. In a strand curriculum, students are taught several things concurrently and the planned variation within a lesson can promote better focus for students. No-one wants to spend 50mins practising embedding quotations!
Insufficient Cumulative Review
Students studying a spiral curriculum are often not given enough review or practice. For review to be effective, it needs to result in students becoming fluent. It should be distributed over time and should involve the gradual integration of individual components through sufficiently varied tasks in order to promote generalisation.
In a strand curriculum, skills are revisited across many, many lessons and cumulative review is a core mechanism of this approach, helping students to develop flexible knowledge.
My next post will explore an example instructional sequence.
Here are some explicit instruction approaches for teaching creative writing. All of these are explained in depth in my new book, Explicit English Teaching.
Start with a model text
The ideal model text will have an easily replicable structure that students can emulate or adapt. It will also have certain techniques, components or elements that can be discussed, modified and used by students. Typically, I will spend a lesson or two reading, annotating and discussing a short story that fits this description. Usually, I read the text to give the students a model of good prosody and intonation before asking them to discuss various parts in pairs. If students are asked to find stuff in the text, it is helpful to show them how to do this under the visualiser, pre-empting possible misconceptions or poor selection: only underline the words that you are interested in; your selection should be as concise as possible; make sure you label the type of language (image, word, metaphor etc) as well as making some notes as to what it brings to mind.
Once we have read the story, I will often provide students with a chronological plan that summarises the plot. The short story ‘The Knowers’ by Helen Phillips (in this blog post), has this plot:
Establish idea that you can learn when you will die: dialogue between 2 characters (opposite viewpoints)
Queue for government office to find out: dystopian/bleak
Argument and dialogue between 2 characters: learn day but not year
How to ‘celebrate?’ the day
Description of normal life
As grandparents: learn she will miss birth of grandchild
Final week
Final day
6 minutes to go: still alive
The Knowers is ten or so pages long and students will not be able to produce something of this length in a typical lesson. As a result, it can be useful to show them additional, shorter versions of the story written by the teacher that condense the original while still retaining the structure and the transferable elements. If a model is to be truly useful, it should provide students with flexible, generalisable skills that can be applied to the widest range of relevant contexts. When they write their version, they can use this plot (helping students who struggle for ideas); students who have their own ideas, however, are free to ignore it and use their own narrative structure.
Teach components, initially in isolation
Choosing high utility components (i.e. they have the widest possible application) is an important start point. Asking students to practice anastrophe (how Yoda speaks: jumbled syntax and deliberately incorrect word order) would be a possible example of a low-utility component; asking students to practice combining dialogue with description would be much better as this component will fit lots of creative writing tasks. Components should be taught initially through restrictive drills and practice exercises before asking students to use them in wider writing. This post explores the transition from drills to wider application with regards to analytical writing.
Here are some examples of teaching ‘dialogue with description’:
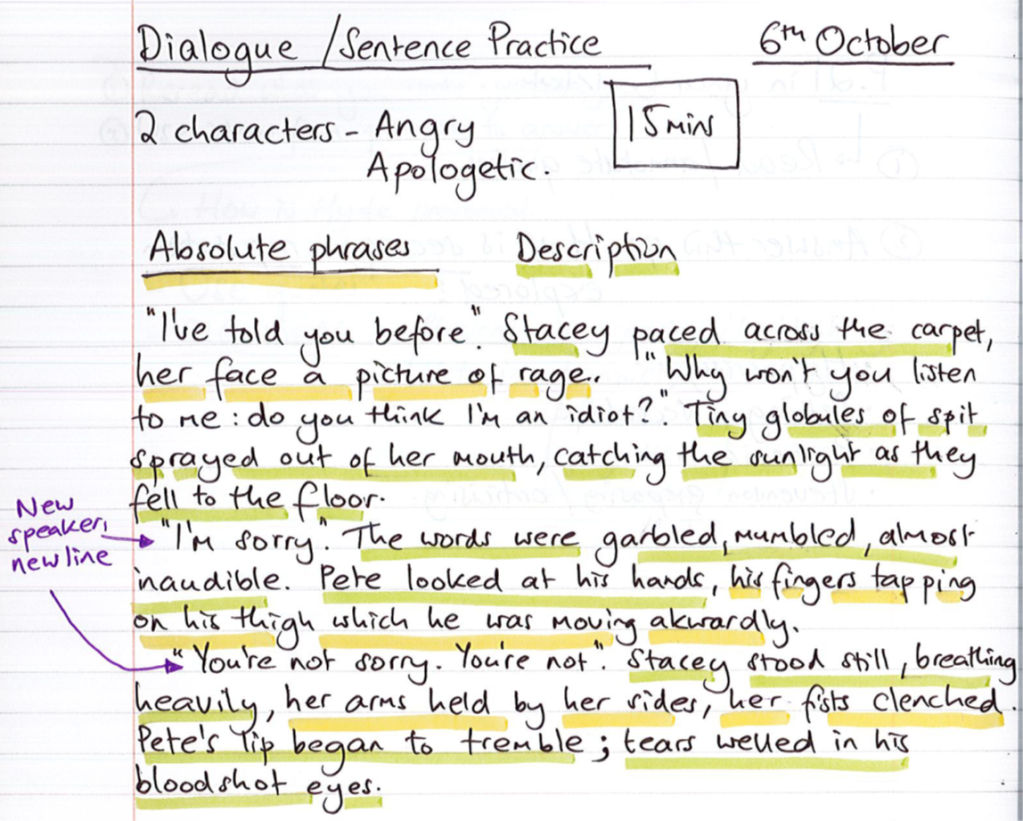
Students in this year 10 class had already been taught to use and manipulate absolute phrases through a 15+ lesson instructional sequence. They had also recapped the conventions of punctuating speech. The exercise above asked them to combine these two skills.
A second activity looked like this:
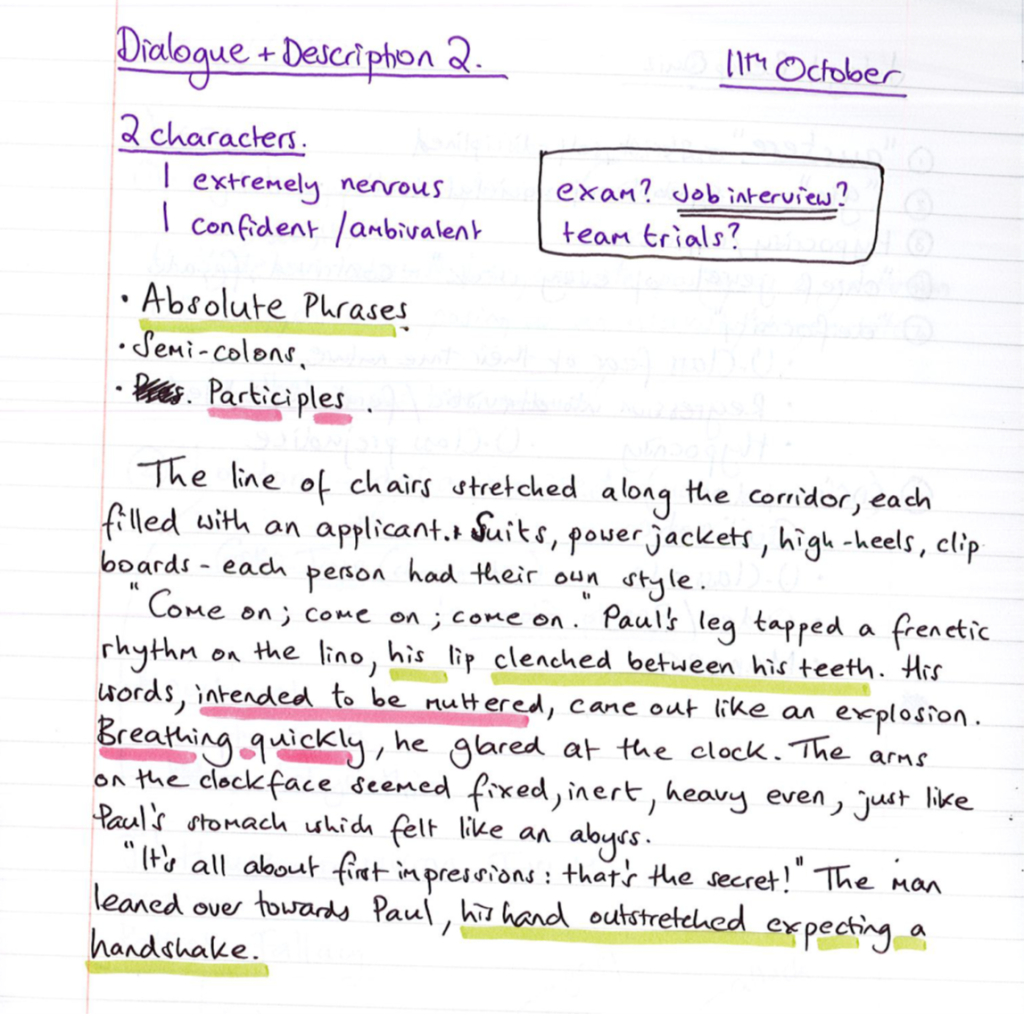
This second task asked them to combine a wider range of components, each one having been taught initially through isolated practice.
Once students are accurate and fluent in these components (and mini combination drills like the ones above can be really helpful in achieving this), they can be added as success criteria to remind them to include them in their wider writing.
Write while they write
This provides students with further models to borrow from and adapt. The teacher can draw their attention to specific things that they should be trying to include. Here are two half completed versions of The Knowers that I wrote in class:
I have deliberately used the same plot as I want to support the weakest writers, students who are probably more likely to stick to the original plot than create their own from scratch.
Whole Class Feedback to inform next steps
After taking in their books, I will read all their work and make notes as to strengths and weaknesses, the latter being the focus for continuing instruction. This week I asked my year 7 class to write a story inspired by The Knowers and, after having read their work, it was clear that they needed some help with semi-colons and varying their sentence structures. Although they had completed an instructional sequence about semi-colons earlier in the year, many of them are still making errors with this construction. These errors and omissions tell me that I need to look back to the semi-colon sequence as it has not been successful. Does it contain a desirable range of examples? Does the sequence transition from models to completion problems to independent practice too quickly? Is there enough practice? Is there enough later, distributed practice to ensure that students retain this skill?
Whole class feedback, if done properly, should inform curricula change. As Engelmann points out: If they make mistakes, they’re telling you, fundamentally, that you goofed up and they’re also implying exactly what they need to know.’ See this interview for more information.
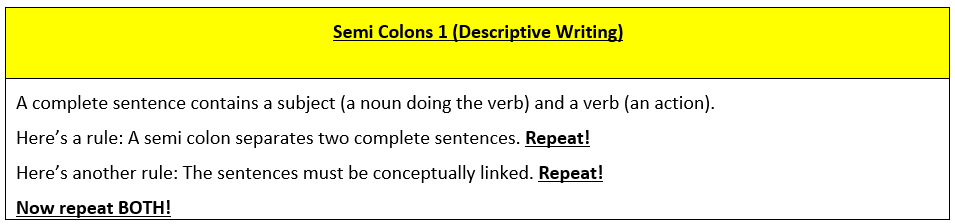
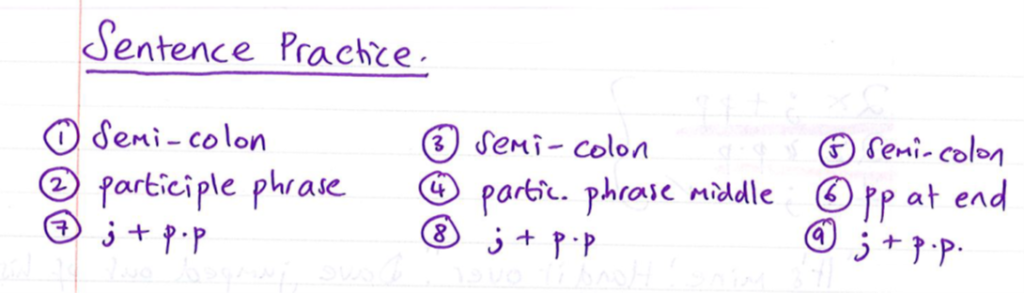
This is what I did to reteach semi-colons:
Task 1: Intro
Because I was fairly certain that the class knew the definition of a sentence, I didn’t need to go back any further to reteach subjects and verbs. If they weren’t secure with these, attempting to teach semi-colons would have been difficult or impossible.
Students chorally repeated the 2 rules and I checked that they understood the meaning of ‘conceptually linked’.
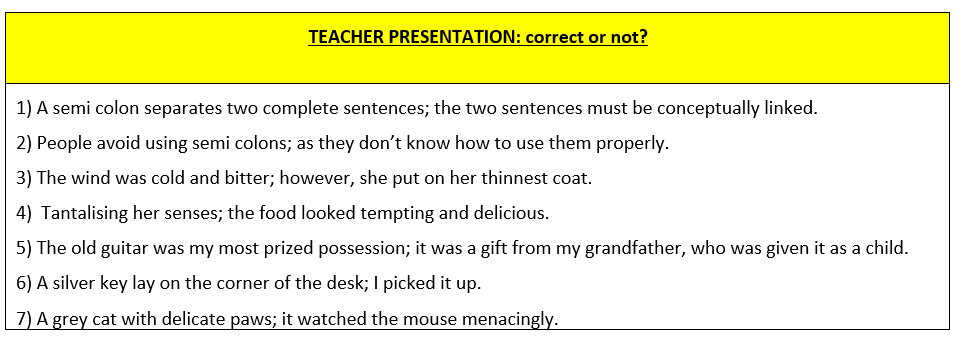
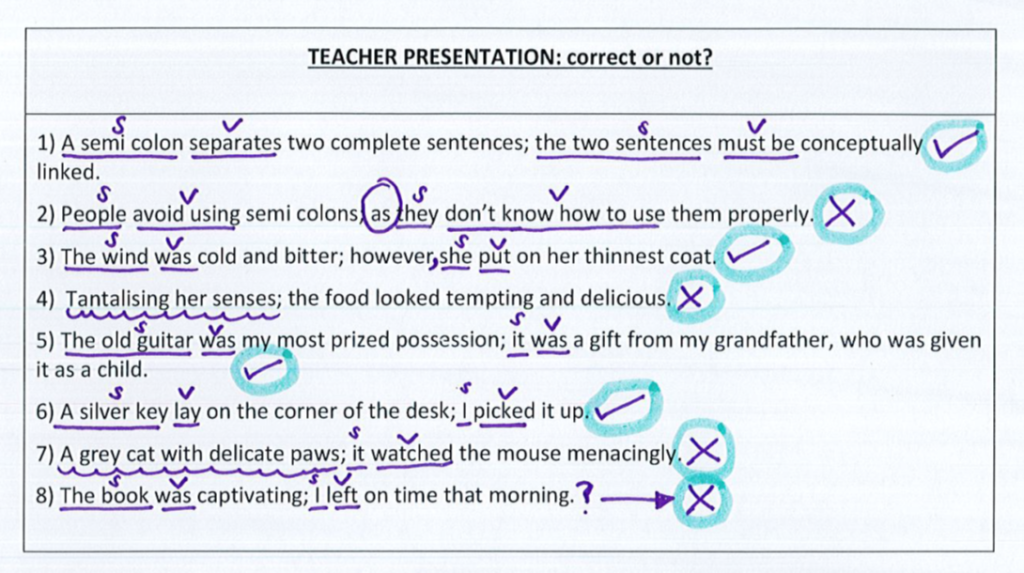
Task 2: Teacher presentation
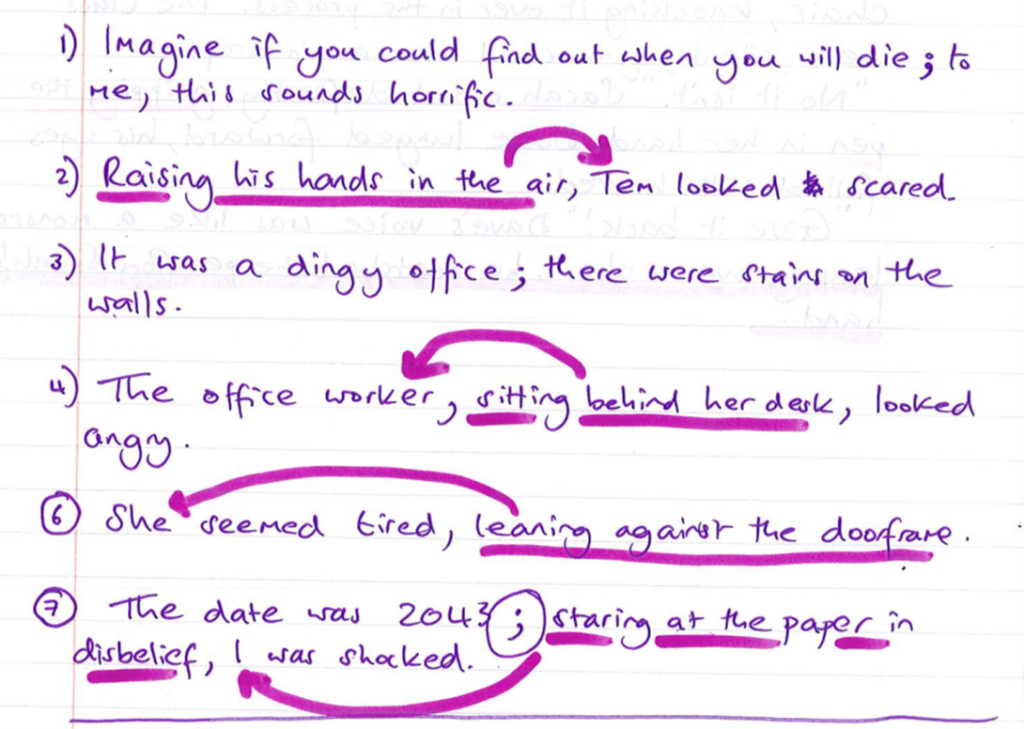
We worked through an instructional sequence that leans on the principles of juxtaposition from Direct Instruction. I read and annotated each of the sentences below in turn. Students did the same on theirs.
By the end of this, students had this on their sheet….
Sentence 8 involved a brief discussion: are the two sentences conceptually linked? Does it make sense? If not, how can we change the second sentence so that it does?
The erroneous sentences contain common errors: using coordinating conjunctions (FANBOYS) with semi-colons; separarting phrases with semi-colons and sentences that are not linked or don’t make sense.
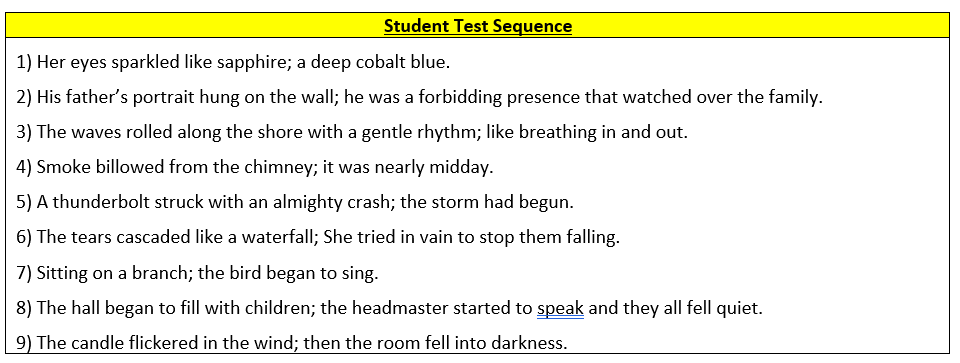
Task 3: Student Test Sequence
Students then had to do the same annotations to a second similar set of constructions, deciding if the sentence is correct or not. This is to check if they have acquired what is being taught as well as whether they can accurately recognise constructions that use semi-colons properly.
Task 4: Independent Practice
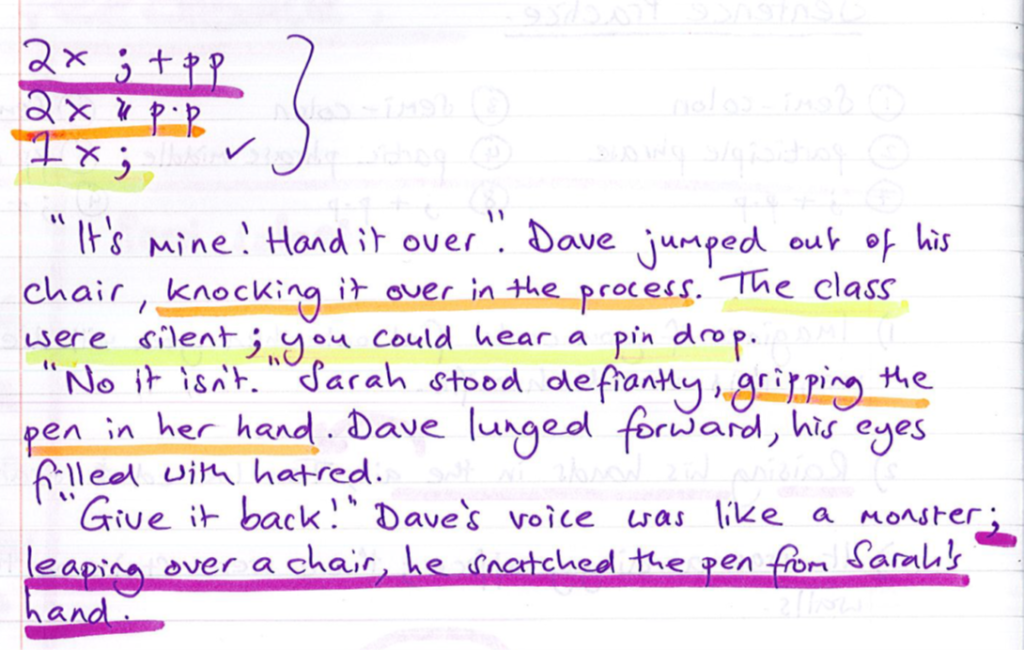
Because the student success rate was really high, I then asked them to begin some independent practice and produce sentences of their own.
This task initially asks them to produce semi-colon or participle phrase sentences before asking them to combine these two constructions together to form more complex sentences. They wrote sentences based upon their version of The Knowers. I quickly wrote some on the board to give some further examples. While they were writing, I went round and checked all students giving hints and prompts to ensure they were being accurate.
Task 5: Wider Independent Practice/Integration with other skills
After checking all books while they were writing to ensure that success rates were high enough, I then asked them to combine these sentences with ‘dialogue and description’, the high utility component that I explained earlier in this post. Students were asked to describe an argument between two people and had to use the constructions from the previous tasks in this short piece of creative writing. While they wrote, I wrote mine under the camera, labelling where I had used the constructions and providing further support for those who needed it.
What is next for this year 7 class?
More varied and distributed practice that asks students to combine all of these skills across a number of lessons.
Teaching additional high utility components, initially in isolation before being gradually integrated with these.
One of the key features of deliberate practice, a highly effective approach to teaching writing, is to approach instruction at the level of components, splitting up the complex task of extended composition into small steps that can be practised in isolation before being combined together. Rosenshine’s Principles of Instruction also suggests that we should ‘present new material in small steps with student practice after each step’. Both of these frameworks are explored in depth in my new book, along with lots of fully explained examples about how to apply them to the classroom.
This post will explore how to build up increasingly complex analytical writing by teaching and combining individual analytical components.
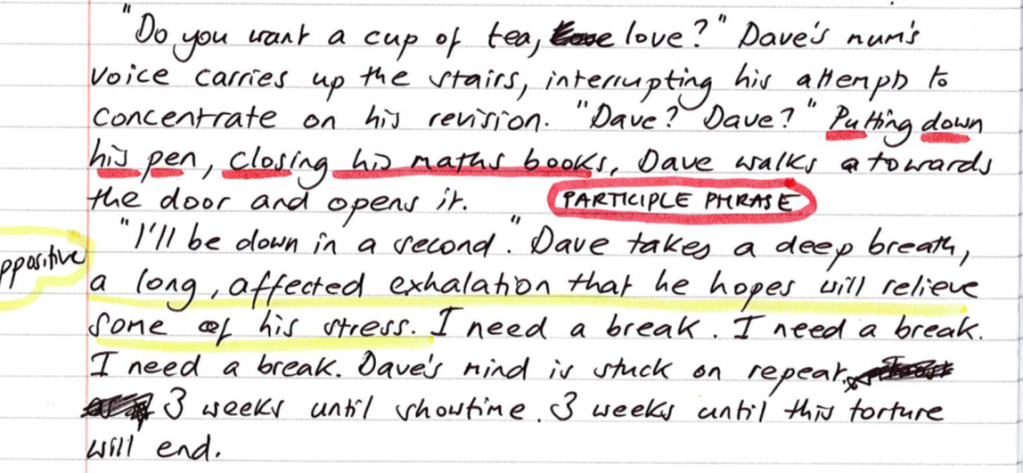
Last term, my year 8 class completed a 20 lesson instructional sequence that taught them how to write noun appositives: see this post for an overview. At the end of this sequence, all could produce and manipulate the structure in both descriptive and analytical writing. A fully explained sequence can be found in Explicit English Teaching. This term, I wanted to give them additional practice with using this structure when writing in response to texts; I also wanted them to combine it with other skills so that they become accurate and fluent in creating transferable, useful and well-crafted analytical paragraphs.
Here’s an overview of the steps that are being combined, in the order that they were taught:
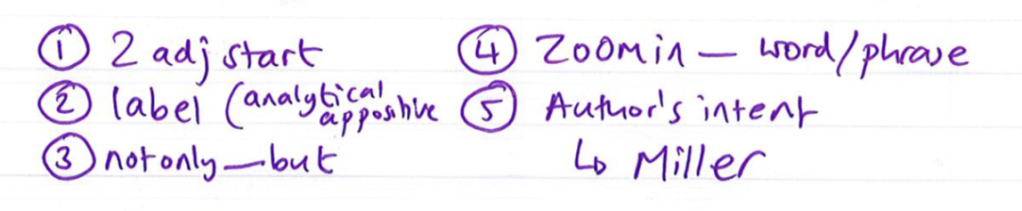
Appositives used for labelling language and as the start of analysis
Appositives + not only….but
Appositives + not only…but + zooming in
2 adj start + Appositives + not only …but + zooming in + authorial intent
Here’s what we did. The lessons below did not only focus on the things described and there were other lessons in between that involved reading and discussing the Crucible and other texts.
Lesson 1: Recap of Basic Appositives
I asked students to write an appositive about some of the characters from the Crucible (our main text this term), giving them labelled models to use as analogies.
Lesson 2: Combining Appositives with ‘not only..but’
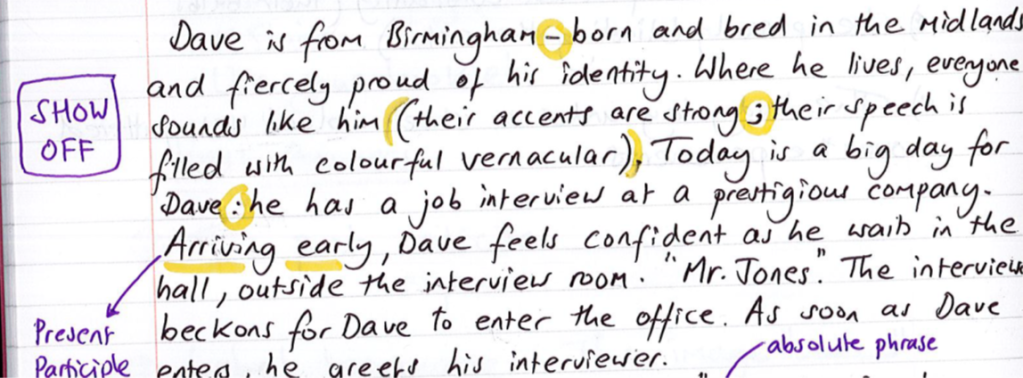
We read Lamb to the Slaughter and used this as a focus for analytical writing. First, I asked them to write a couple of sentences about two characters, giving two labelled examples and harnessing the ‘worked example effect’.
I then wrote this example under the visualiser while they watched:
After writing it, I labelled and numbered it, highlighting to the students the components that make it successful and the things that they would be including when they write theirs:
An adjective that adds interpretation to the appositive
The appositive which labels the type of language in the quotation
(and 4) ‘not only….but’ A means of adding multiple interpretations to writing.
With the example up on the board, I asked them all to write a similarly constructed piece, using this quotation:
Before they started, I asked them to answer the following questions in pairs, using Think Pair Share to help them generate and develop ideas. What type of language is it? What does it tell us about Mary’s state of mind? etc After a short discussion, they all began writing in silence. While they did this, I went round checking, giving little prompts and helping a few students. When they finished, I asked them to label their writing with the 4 things that are on mine: this is a precise form of AfL self-assessment, acting as a check and reminder that they have completed it properly. I then showed 2 student pieces under the camera to the class, giving a further model to everyone and motivating the students that I chose. Because 4 students were still a little inaccurate, I asked everyone to do a second one, following the same procedure as A. This part of the lesson can be seen as guided practice where I am helping them to move from examples to application.
After this one, the whole class were successful. This high success rate meant that I moved to massed, independent practice, asking them to complete two more without support:
Success rates were high and we ended the lesson by showing more great student work under the camera.
Lesson 3: Further development: adding in ‘zoom in’
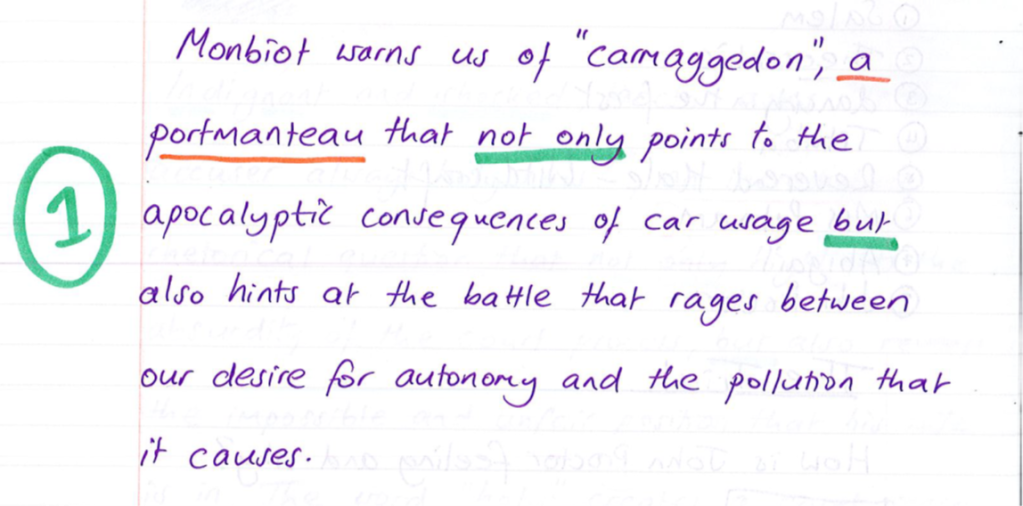
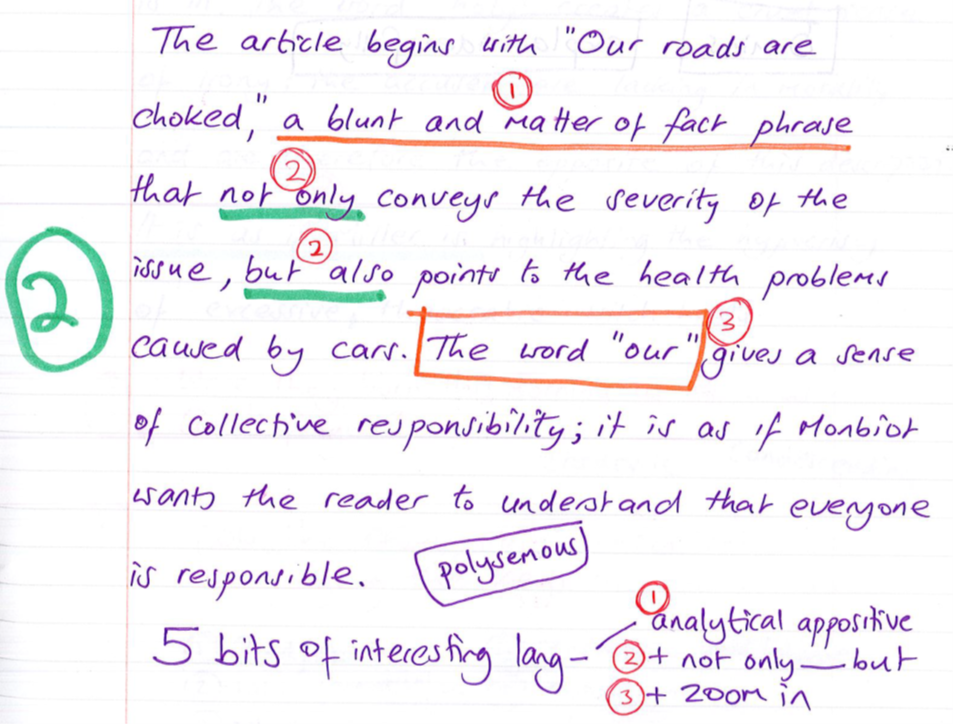
The next lesson we read and discussed an article about pollution, looking for interesting language that the writer used. First I wrote a model under the camera that mirrored the example from the previous lesson:
This model shows them that despite the fact that the text is different to the previous lesson (non-fiction vs short story), they can still use this construction when responding to it. Transfer is difficult to achieve but two promising avenues for increasing the likelihood that students can transfer what we teach them is by creating varied practice opportunities as well as drawing their attention to the similarity across different tasks: varying the text type here meets both of these requirements.
I then wrote a second model, showing them how they can extend their writing further by adding in another analytical skill: zooming in on a word. Because they have practised this skill in isolation, there was no need to practice it before asking them to combine it with the previous structure. See this post for an overview of how to teach zooming in.
After labelling this second model with the three things that make it useful (analytical appositive/not only…but/zoom in), I asked them to complete 5 similar pieces of short analysis using five pieces of evidence that they had found in the article. This is independent massed practice and the aim here is accuracy and fluency.
Lesson 4: Further development 2: adding in ‘2 adjective start’ and ‘authorial intent’
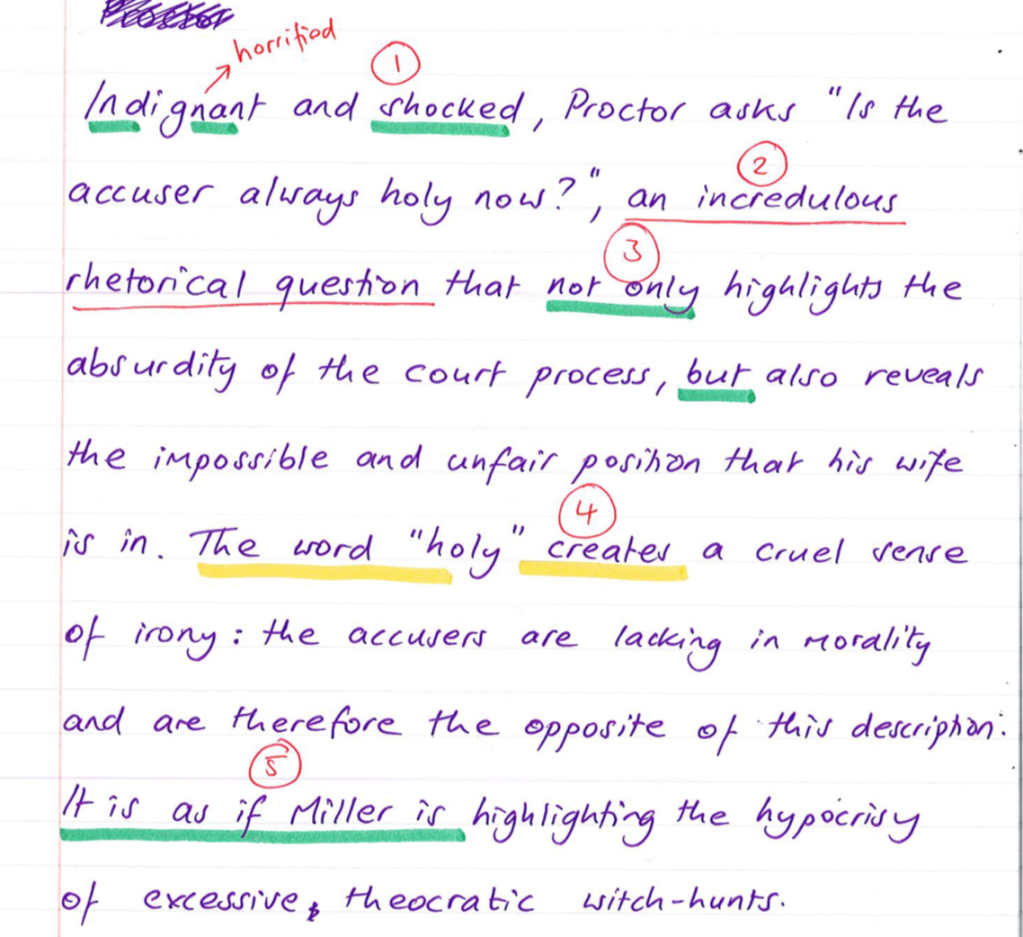
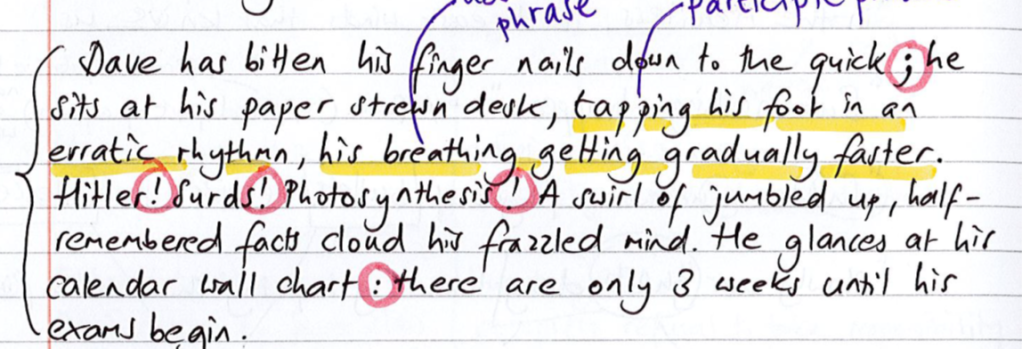
In a previous lesson we had spent time discussing John Proctor’s language when he decries the absurd and unfair accusations against his wife. I wrote this model under the camera and labelled it:
I drew students’ attention to the addition of authorial intent (number 5). I then showed this quotation:
We discussed it using think pair share: What does John Proctor mean here? What technique is being used here? What phrases or words could you zoom in on? Etc
I then asked them to write a comparable structure to my example. They all needed to include the 5 labelled elements in the model. While they were doing this, I went round and checked, sometimes commenting on what I read to give people further help: ‘Darren has started his with Fearful and Skeptical…..Penny has zoomed in on ‘born this morning’ etc as well as making corrections and giving reminders to those who need it. This is guided practice and the goal is accuracy and the beginnings of fluency.
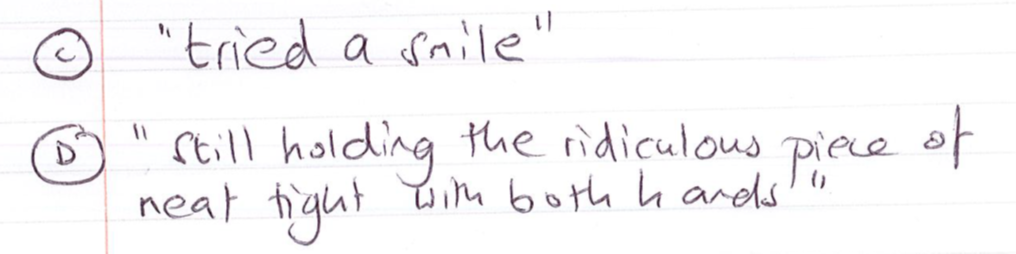
When they were done, I showed 2 students’ work under the camera as further models of excellence. I asked the class to discuss in pairs where each of the 5 elements were in the answer, giving further reinforcement on the components. Because success rates were high (all had completed the task successfully), I asked them to do one more, using this quotation:
I removed my model from the screen and replaced it with a list of what they need to include, increasing the challenge and removing the scaffolding:
What’s next?
High success rates in these lessons are perhaps unsurprising due to the models, success criteria and highly restricted nature of practice tasks: as a result, it would be silly to equate success here with learning. Success here is performance not learning. Over the next 10+ lessons, I will ask them to keep practising this with less and less support until they can do it fully independently. This practice will be increasingly distributed to ensure that they retain what they have been taught. Practice will be maximally varied: different text types, different ordering of components, sometimes doubling components (2 ‘zoom ins’ etc). This is to help build flexible knowledge. The sequence above and the lessons that will follow are moving students through ‘The Instructional Hierarchy’. Learning often begins with restricted mimicry but this is often a necessary foundational stage on the journey towards adaptive, flexible and generalised application.
This post will explain how I teach students to write well-crafted pieces of persuasive writing. This is one of the strategies explained in my new book which is out now.
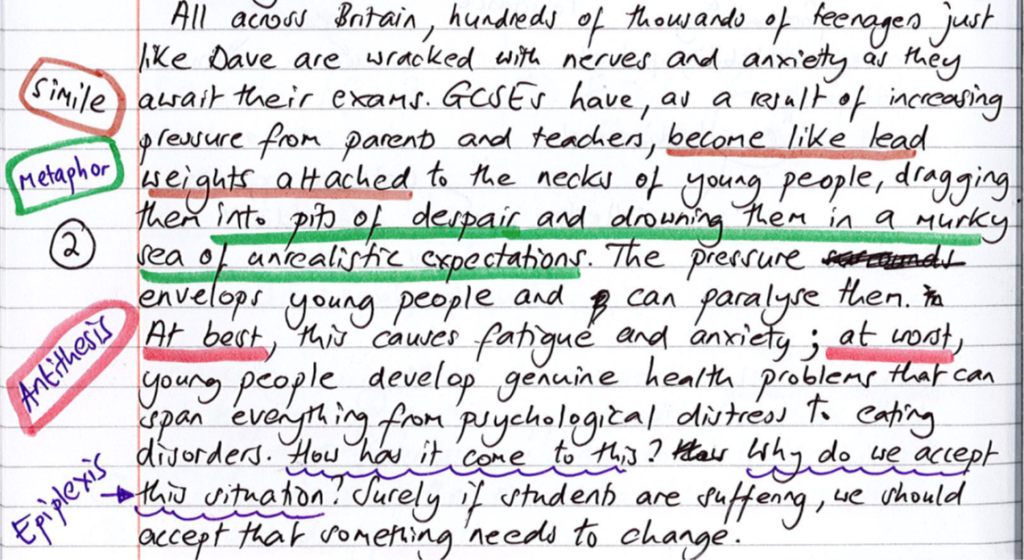
This strategy leans on the approach taken by charity advertisements and quality journalism, both of which tend to use the stories of real people to captivate the attention of their audience. Charity adverts show pictures of people suffering in order to elicit sympathy from the viewer; literary newspaper articles often begin with an emotive vignette into the life of a person who is affected by the issue. This can be really powerful. People rarely become emotionally engaged with abstractions or statistics; however, people instantly sympathise with characters and narrative. While factual arguments can seem insipid and distant, dissuading those who are not invested in the issue from continuing to pay attention, an evocative description can bring an issue to life, enthralling the casual reader and heightening their interest. Not only that, but vivid descriptions are ideal for showing off, helping students to increase their out of 16 mark for fancy language.
The Personal General Approach
This approach to question 5 has four sections:
PERSONAL: Start with a personal story, describing someone affected by the issue
GENERAL PROBLEM: Show how this issue is a problem across the country or world, describing the problem
GENERAL SOLUTION: Offer an alternative approach and solutions to the problem
PERSONAL: Return to the person described in section 1
Section 1: Personal
Here are a couple of examples….
Question: Exams are too stressful. They should be banned.
Question: ‘We should celebrate different accents. No-one should feel under pressure to change the way that they speak.
I tell student to show off like crazy in the opening section so that the examiner cannot fail to reward them for fancy language (thanks to Di Leedham for suggesting this!). Crucially, all of the highlighted things are taught to students initially through restrictive practice drills so they become accurate and fluent before they are asked to include them in wider writing. See this post for an explanation as to how to move from drills to extended writing.
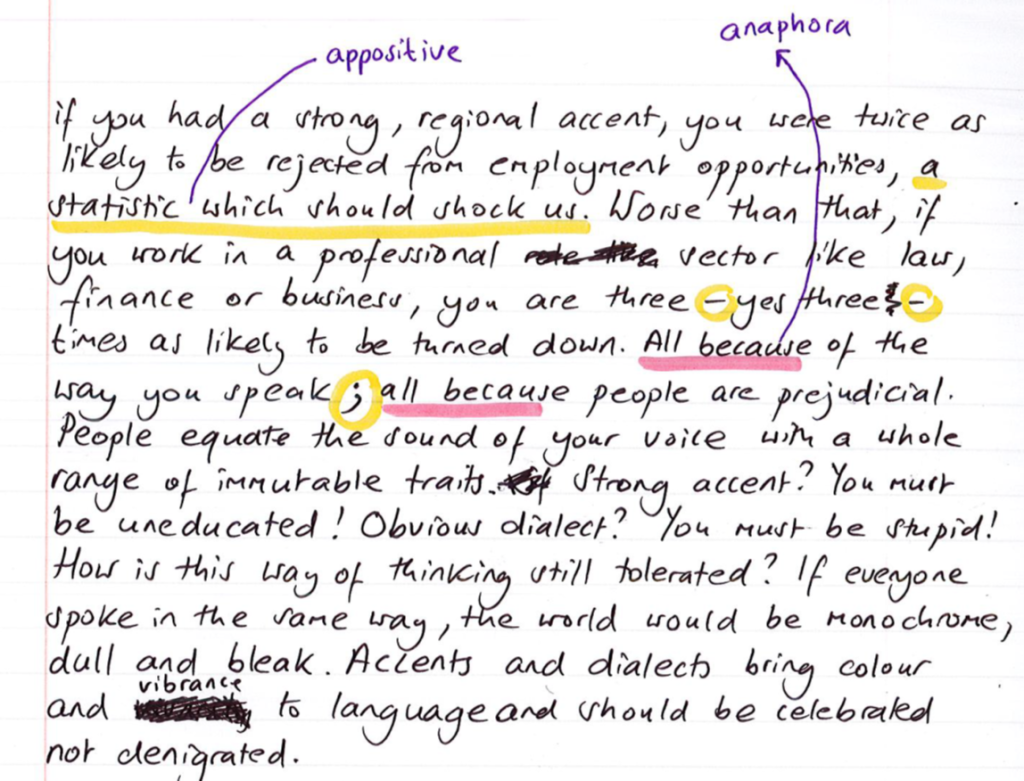
Section 2: General Problem
Once students have produced an evocative description of someone affected by the issue, section 2 demonstrates the scale of the problem. This section allows students to write developed explanations and arguments. It also allows them to include rhetorical techniques and other figurative language to bring the issue to life.
Here are a couple of examples:
Question: Exams are too stressful. They should be banned.
Question: ‘We should celebrate different accents. No-one should feel under pressure to change the way that they speak.
Section 2 can be started with some kind of linking sentence that connects the person to the general problem. Here are some possible examples:
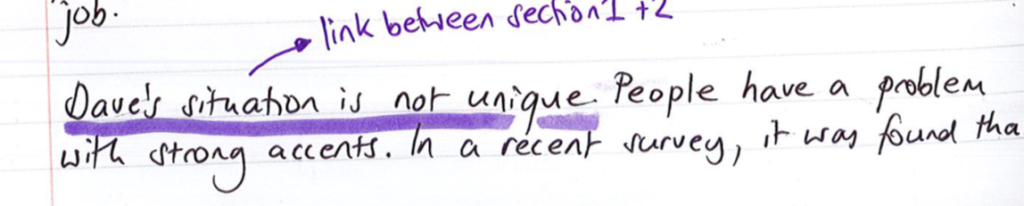
Dave is not alone.
Dave’s situation is not unique
Dave is one of thousands of people who……
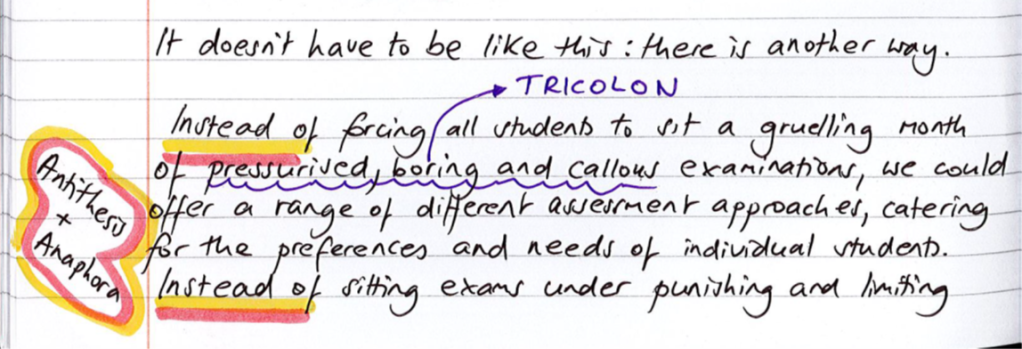
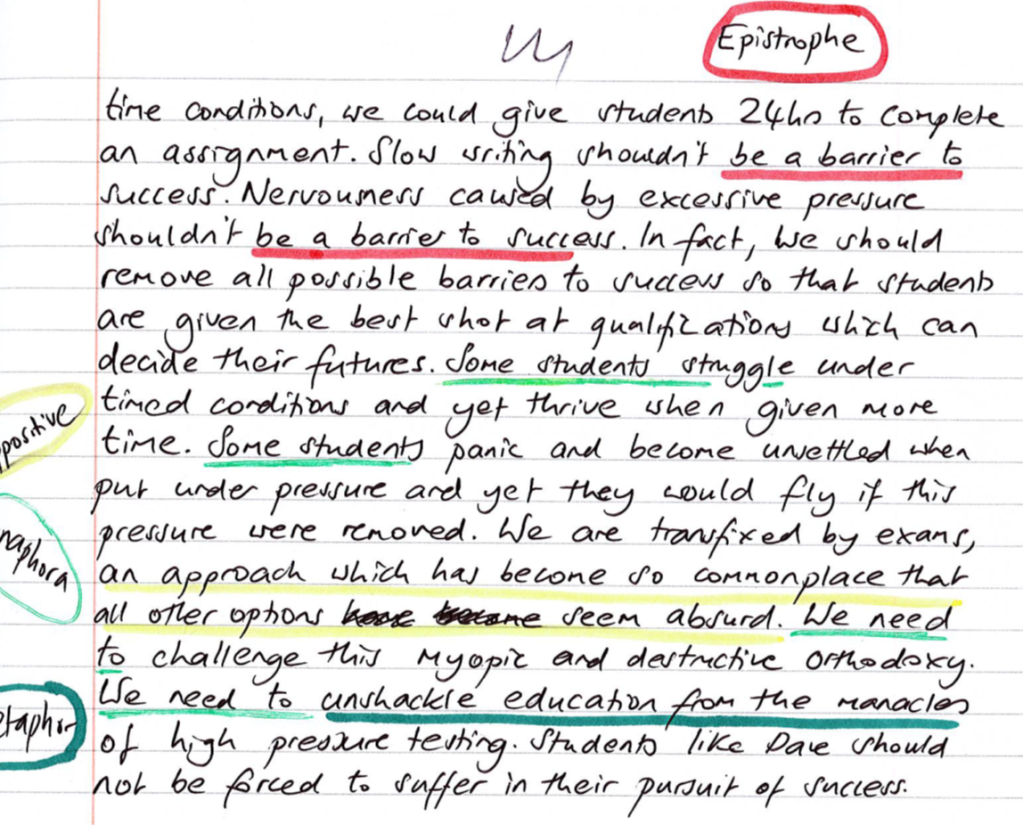
Section 3: General Solution
This section allows students to present an alternative; like with section 2, they can include lots of rhetorical techniques and figurative language to make it sound more polemical and passionate.
Here’s an example:
Question: Exams are too stressful. They should be banned.
Section 4: Return to the person from section 1
This section asks students to return back to the person described at the start of their piece, making their writing seem coherent and well planned in a sort of circular narrative type approach. Perhaps their character has undergone some kind of change and the problem has been solved; perhaps the character is imagining a better life or perhaps nothing has changed at all. Like with section 1, this involves creating a vivid description and allows student to show off and include all the fancy things that they can do.
Here’s an example:
Question: Exams are too stressful. They should be banned
How to teach this approach?
Here are some things that I do:
Students become accurate and fluent in whatever components (participle phrases? Anaphora? Colons? Counter-arguments? Etc) I want them to include through restrictive writing drills before they are asked to apply them to wider writing like this.
I practice each section in turn, gradually combining them together into wider pieces of writing. First we practice section 1 a lot; then this is combined with section 2 and so on.
I write live under the camera, highlighting my work to show how components can be integrated into extended writing.
I sometimes interrupt everyone to show them what I or someone else has done: Look at the way that Dave has linked his section 1 and 2/ Look at how Vikki has used three grim metaphors to describe pollution.
I show lots of excellent student work under the camera and label what makes it successful
Why is this approach useful?
Irrespective of whether the examination asks for an article, letter or speech, this approach fits them all! (It doesn’t matter if students forget to write Dear Mr. Smith if the task says letter: if their writing is brilliant, they will get high marks)
Practising this structure over and over again gives students a massive help in the exam. While we cannot predict the topic, we can give them a highly transferable, high-utility strategy for them to use. This allows them to direct their attention to developing their ideas and crafting their writing instead of panicking about how to start or what order things should go in.
It is ideal for showing off: the inclusion of descriptive elements allows students to put in all their fancy skills.
Here are some other complete models of this approach:
Homelessness
Child Labour (showing how this approach fits a letter)